
2·
11 days agoThis comic has always resonated with me. THIS is how we incorrigible know-it-alls of the world can use our powers for good, or at least for not actively evil, LOL.
This comic has always resonated with me. THIS is how we incorrigible know-it-alls of the world can use our powers for good, or at least for not actively evil, LOL.
We have a president who issues fascistic edicts from the toilet and then phrases them like a Karen in her first term on her HOA or Condo board.
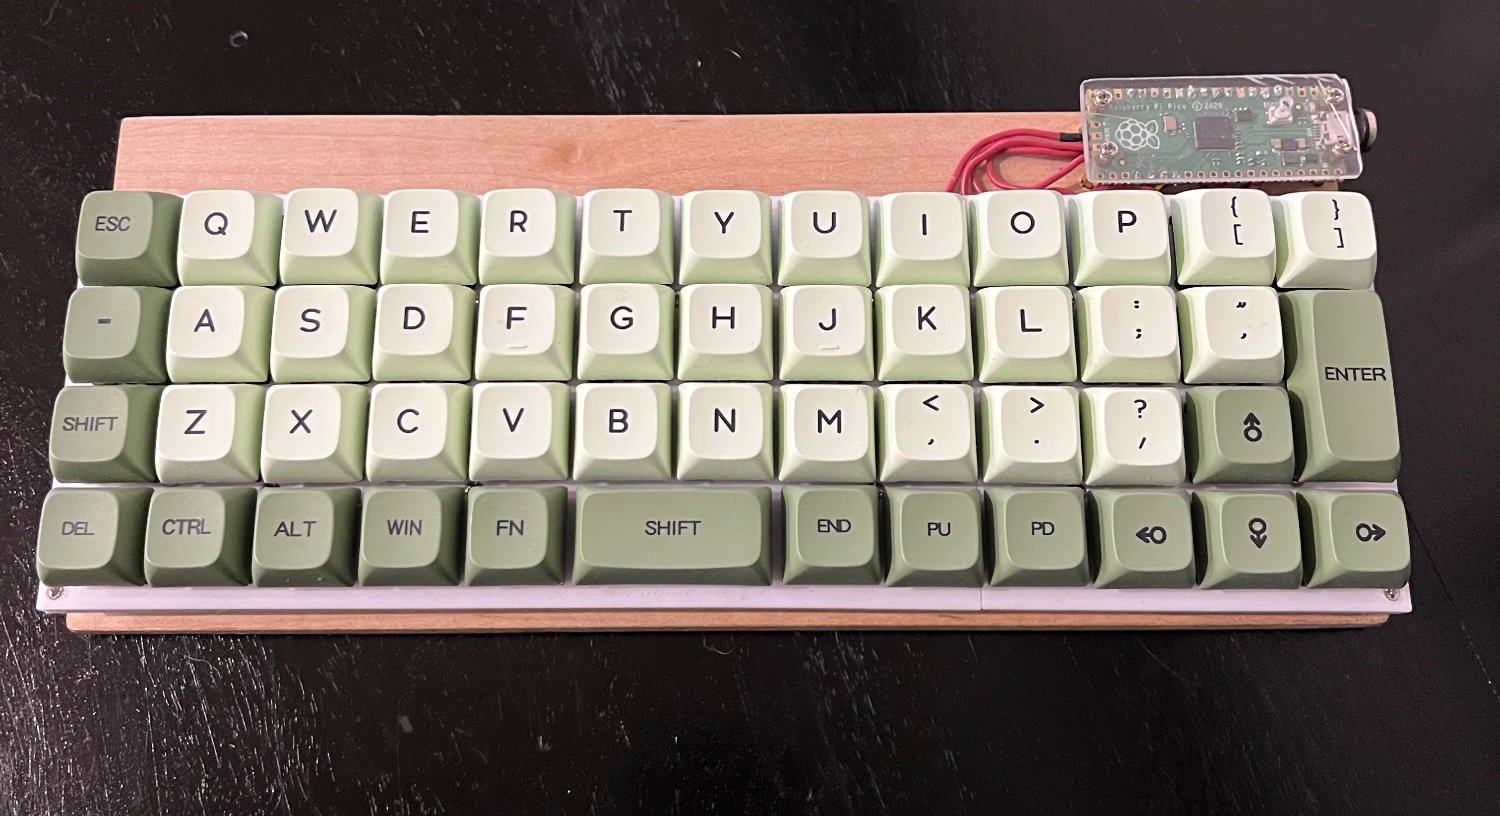
Hand wiring can be a lot of fun. I have done about a dozen boards, including the “pocket battleship” I use for work everyday. This looks perfect.
Did you go with KMK?
For the very basics of KiCAD, their own intro is helpful. I had to wrap my head around the workflow: first schematic, then PCB.
Once you grasp that, some keyboard specific stuff is described by Joe Scotto in this video. He tends to rush his tutorials though, so best to go through the KiCad page first or revisit the video after.
For resources, I found Ai03’s library of footprints to be perfect, except that his vertical 2U were not oriented how I needed them, which I realized too late, LOL. Then, the kbplacer plugin by adamws was absolutely invaluable and saved me so much time. I used JLCPCB, because even when US-China tariffs were at their worst (and goodness knows they could be again if Trump gets a hangnail or something), JLC was still the cheapest option for me.
If you’ve never done a PCB before, I might humbly suggest keeping to a fixed layout for the first go-round. I did that on my first board and it worked perfectly for what I intended it to be. I got a little ambitious with this one, and ambition+inexperience+impatience led to a flawed project.
SKCM white. Both switches and keycaps (and the front feet, actually) came from a fried early-90s Focus keyboard that had a trackball where the arrow keys go, and the arrows were around it on mouse micro switches with little flappy “buttons” that are part of the case, also very mouse-like.
For the PCB, lots of YouTube and searching Geekhack, deskthority, and (yes) Reddit to see how to use KiCAD for mechanical keyboards. Mine uses the “cheat” of mounting a Raspberry Pi Pico clone to the underside so I don’t have to know as much about electronics (that part actually went perfectly).
The mistakes were two tiny bits of trace that got deleted but I didn’t see, and some placement issues for the Alps version that I had to work around. I have four of them left, so I’ll just use MX compatible switches and a normal sized spacebar for future builds and avoid the worst of it.
Get any QMK board with enough keys and the other features you need, particularly if its got a VIA/VIAL config. It’s inherently programmable (literally every key) and cross-platform. The “easy” answer here would be a Keychron, but there are others.
If you can drop in size just a touch, where you still have a numpad but a small number of keys are moved, removed, or resized, then there are many enthusiast and near-enthusiast boards with “96%” or “1800” layouts, the main difference being whether the arrows, F-row, and numpad are fully compacted into a rectangle or slightly separated to guide your hands.
The very specific combination might not have been done, but full size PCBs are out there, especially as replacements for vintage boards. If you don’t mind ISO and only a row of LEDs rather than per-key, there’s THIS, which seems to have Bluetooth. They seem to have made some interesting choices with the numpad as well, which is for the most part NOT electrically distinct from the numrow.
There’s also this collection, which might send you in the right direction. If you can do some coding in QMK/ZMK, you might be able to make one of the BLE enabled Pro Micro clones work.
Not immune, but let’s say resistant. Due to federation, they couldn’t lock down existing federated content; due to open source they couldn’t lock down the user experience; and due to those two, nobody’s going to offer them a check for a couple million dollars.
Rober’s always seemed a little off to me, like one of those who enjoys being famous more than the stuff that made him famous in the first place. Seems like he’s gotten worse, though. For instance, this video declares it “was not sponsored [by Zipline] in anyway nor did they pay for any of my travel or accommodations,” despite extolling their virtues over and over again by name, and lingering lovingly on their drones and logos like Michael Bay with a car company’s badge.
Smarter Everyday is also rather polished, and he’s even more in bed with the military industrial complex, but (as of a few months ago anyway) he comes off like he’s still actually enjoying the projects themselves and the information he’s sharing. It’s hard to exactly articulate the point where a content creator loses me, but I can feel it in my nerd-bones.

Late to the game on this one, but Thomas “Chyrosran22” reviewed this board. I watched it a while ago, but IIRC, it boiled down to “pretty mediocre board, but fine, elevated by the keycaps.”